


8 Steps for Creating the Perfect Shade Sail
If you want to make the best use of your outside areas, installing a shade sail or waterproof canopy is a fantastic idea. Shade sails offer a great source of sun shade and UV protection, plus water protection, allowing you to enjoy the outdoors and relax outside in comfort.

The benefits of installing a Shade Sail:
- Fantastic sun & UV protection - up to 95%
- Waterproof options - enjoy the outdoors all-year round
- Create more living space
- Increase the value of your home
Shade sails combine the very best of both form and function.
Offering more than just sun protection, shade sails are also visually appealing. With unique aesthetics that cannot be achieved by any other means, an architecturally designed shade sail can really transform outside areas.
If you are thinking of installing shades in your own home, the following is a list of important steps you should consider.
Step 1) Come up with a great design
The first step for creating a wonderful shade is to determine which area you need protected, and how much overall shade you will require. It's a good idea to start off with a simple 4 corner 'Hypar' shape (shown below) as the initial concept design, and then experiment from there.
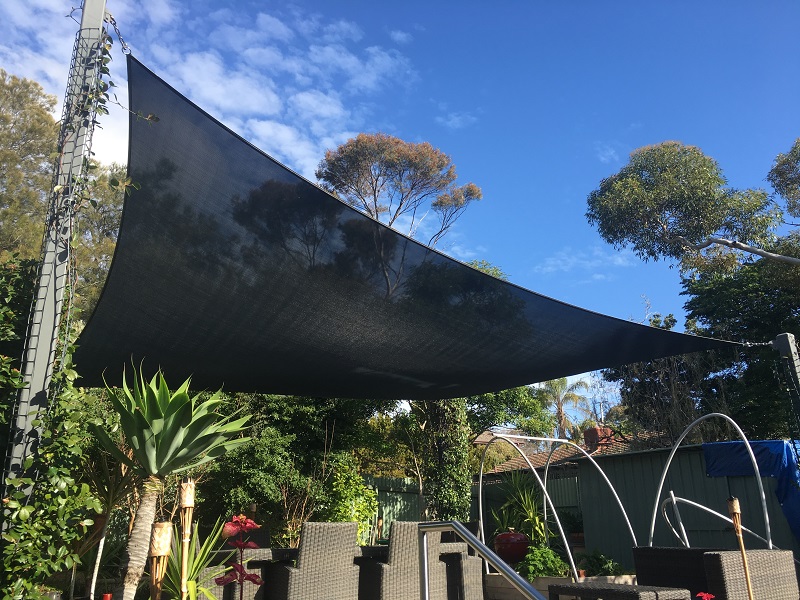
Shade Sails are perfect for outside deck and patio areas
THE IMPORTANCE OF HYPAR
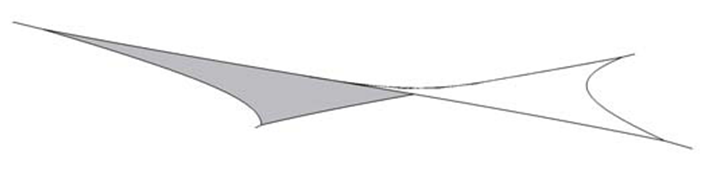
In order to ensure a strong shade that keeps its tension and doesn't flap in the wind, a shade sail requires a certain degree of twist or shape. This is done by using alternate high and low fixing points, to give the sail twist. Known as a 'Hypar', this shape increases tension in the shade, reduces flapping in the wind, and it also improves overall longevity.
Need more design options?
The beauty of a custom shade sail is that you can create almost any type of 3-dimensional shape your heart desires.
If you want to add posts and create a 5 or 6 post sail - that's no problem! Perhaps you want to fix to an existing structure or use a rope-track? Maybe you want to add extra sails for a layering effect...?
With the ability to do all these things and more, you really can build what you want, as long as you stick to sailmaker and engineer recommendations.
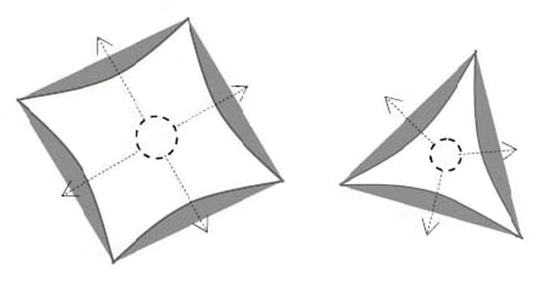 Avoid three-sided sails
Shade sails are designed with hollow concave edges to help tension the fabric. Because of these hollows, a three-sided sail (triangle) will provide less than 50% of the shade from a four cornered sail. Also a triangle sail will always remain flat as it has no 3-dimensional shape. This makes a 3 sided sail prone to flapping and the pooling of water. Because of these reasons a sail with a minimum of four sides is recommended.
2) Sun shadow
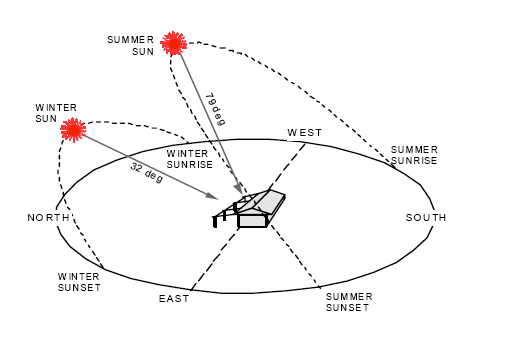
The direction of sunlight varies, not only during the day but also from season to season. When designing your shade sail it is important to consider the path of the sun, to determine the best place to position your shade.
For example, if you have designed a shade that has ample cover during midday, it might not be as effective during the afternoon. To account for this variance in sun shadow, you should increase the overall footprint of the shade, especially on the east and north-eastern sides.
Going one step further, you can get a solar study performed, which will show in detail how your shadow varies throughout the year. If you design your shade with this information in mind, you can ensure the proposed shade will provide adequate protection.
3) Consider a Retractable
If you want the flexibility to control the amount of shade you want at any one time, then you should consider a retractable sail.
Great for shade and added comfort in summer, the Shaderunner® Retractable Sail (see below) acts just like a fixed sail, the difference being you can retract it whenever you need. The option of pulling the shade back allows better temperature control during the cooler months or in the afternoon when the sun goes down. Retractable shading also ensures your home doesn't miss out on natural solar heating during winter.
.png)
Running on stainless steel wires, the Shaderunner® is comprised of folding fabric panels supported on Pulleys. It concertinas in and out using a simple rope & pulley system.

4) Fabric selection
After 30 years of sail making experience, Shadeform have settled on a handful of fabrics, chosen for their superior quality. Each of these fabrics are selected on the basis of having the best properties and overall value for money - compared with any other textile on the market.
![]()
PVC Fabric for Waterproof Sails and Canopies
Used in large sport stadiums across the world, Mehler PVC is a heavy duty structural fabric with 100% UV protection and waterproof specification. Creating a long lasting all-weather covering, this particular fabric offers the longest lifetimes of all fabrics. Mehler comes in a range of colours and a manufactures warranty of 10 years.

Residential Shade Sails & The Shaderunner®
The smooth textures of Outlook Mode make this material very popular for residential applications. This textile doesn't skimp on performance either, offering a high level of protection - up to 95% UV blockout. A Polyester mesh base allows welded seams, eliminating stitch breakdown and allowing easier maintenance and cleaning. PVC coated yarn completes the final layer of this fabric, including a 5 year warranty.

Commercial & Residential Shade Sails
SMonotec is the market leader in high performance shadecloth. tronger than flat tape-yarn shadecloth, this monofilament fabric has a round HDPE yarn. Typical use in high wind environments and for large commercial sun shades. Monotec has the highest expected life time of all shadecloths, with a manufactures warranty of 15 years!
5) Choose your colours
The two main colours you will need to select are:
1) Shade fabric
When selecting colours, you'll find out rather quickly that there is a lot to choose from. Each fabric will come with a set of colour options (Outlook Mode is shown below). It's good to pick a few options first, then take physical samples out and view them in the area of the proposed shade. If you can't manage this then selecting from a chart is accurate enough for most applications.
Lighter colour fabrics show dirt more easily than darker colours, but don’t let this deter you from the lighter shades. All fabric will collect dirt in the end and some of the lighter colours are the most popular! Please note that a darker tone will result in slightly less available light underneath the shade, however it is very little and often goes unnoticed.

2) Post or frame powder-coating
If you are getting new metalwork (galvanized steel posts or frame) then you will also want to pick a powder-coating finish. This is an affordable way to improve appearance and corrosion resistance.
Dulux has their latest 2017 paint range 'Duralloy', which is the go-to standard for powder-coating. When choosing your colour a nice technique is to try and tie in an existing feature, including gutters, fences, or other existing structures. Remember that simple and plain colours are often the best.
6) Have it made right
It is almost impossible for the nonprofessional to make a shade sail that fits. This is because all shade material stretches under tension. In order to get a sail that fits perfectly, with even warp and weft tension all over, they should be designed and manufactured in 3-Dimensional software programs. By doing so you can achieve a strong and robust shade, and improve expected lifetime greatly.


Welded seams, transference of 2D panels onto a plotter table, and dealing with complicated 3D designs - these are the types of things that can only be accounted for using available technology in a sail loft. Also it helps to have lots of experience in sail manufacturing and design!

Following simple, but important steps
Trying to install posts in concrete, to fit a ready-made standard size shade sail, usually ends in frustration and tears. If you try to do things this way what you end up with is a sagging, flapping, pile of mess. A much better solution is to install all posts and fixings first, take exact measurements from point to point, then make a custom shade sail to fit.
This shade sail shown here is an example of what a pre-made standard sized sail looks like, when you try and install posts to fit (this is not a Shadeform sail). No matter what you do, it will never line up quite right, and more than likely it will have to be replaced in a year or two.
Avoid the hassle, it you install a shade sail properly it will last for 10 years or more!
7) Planing & Construction +Engineering
Spend some time and effort planning your next shade sail. Not only will you get a much better looking shade but you will get something that works from day one, with minimal maintenance, and lasts a long time. Some common issues include: structure not to specification, or incorrect footing sizes and post heights.
It may not seem like much but these things can cause huge issues later on:
- Unflattering appearance/aesthetic
- Sail flapping and unwanted noise
- Shortened lifetime
- Catastrophic failure
Shade Sails seem simple enough, but it is very easy to underestimate what it takes to design and construct a good shade. A quality Shadeform Sail is often engineered to Australian Standards, and constructed with the strongest materials and stainless steel fittings.
Can I put it up myself?
It isn’t recommended that you construct the actual shade sail yourself, because of the reasons outlined above. However for simple designs the handy person can certainly help out in some of the other phases of shade construction.
We find that a great deal of good designs come about when clients have an active input with their shade sail.
A common arrangement, especially with remote jobs in the country, is that the client or builder will install the structure (posts and concrete) & then shadeform will manufacture the sail to fit. This way you can save a bit of money and receive a properly designed and manufactured shade, at the same time.
8) Do I need to go to Council?
If you install a shade that is less than 20m2 in size, less than 3m in height, and doesn't extend beyond your homes facade, then you should be able to install it without council approval. If you want to build a shade outside these guidelines (this includes waterproof sails) then you will need to go to council, and you’ll probably need engineering too.
Council exempt rules:
- Shade must be less than 20m2 in area
- Less than 3m maximum height
- Behind your homes facade
These rules vary between states and councils, so be sure to check with your local representative first. You’ll find most councils as quite happy to talk about options if you approach them in a friendly manner. If you would like to contact Shadeform for further help in this area, our team of designers and drafters have experience working with government personal and can streamline your building process.